Friday, June 25, 2010

Crafty Craft Area Organization

On a never ending quest to keep my crafting stash more organized, I came up with a few cheap organizational ideas that I thought might be helpful for someone out there. They've definitely been helpful for me, so far anyways!

I was having an issue with overbuying embellishments for scrapbooking, because I didn't really have them organized and would forget what I had. So I tried organizing them into various boxes, but that didn't really allow me to "see" what I had. I came up with the idea of putting them in Ziploc bags, which helped a lot but I still wanted an easy way to store them where I'd have easy access to them.

I had bought this cafe rod for another purpose, but never mounted it. I found these curtain rings on clearance for $0.50 a 6/pk (yeah, score!) and looking at the two together an idea popped into my head. The first thing I did was mount the rod to the side of my wooden craft island. It's in the garage, please pardon the mess.

Then I threaded the rings and used them to hold the Ziploc bags containing my scrapbooking stuff. Viola! All in one place, organized and easy to see what is there and grab just what I need. It's been awesome so far, and really easy to keep maintained.

Another "hot spot" of trouble was my stash of ribbon/trims. I had all of them crammed in a basket and would just rummage through them to find what I wanted to use. Time consuming, and I was also having the issue of overbuying because I wasn't remembering what I had.

My kids have an easel, and the roll that the paper came on is really sturdy, like seriously 100x's sturdier than any paper towel tube. So I rolled the various items around the tube and kept them secure with small elastic rubber bands that I stole took from my daughter's hair stuff. Now it's all easily stored and organized in one place.

I'm interested in hearing how you keep your crafting area organized on the cheap. What items have you repurposed to fit another need? How do you keep little items in check without buying sometimes expensive organizational tools? Please share your thoughts, I'd love to hear them!

Please click on "Linky Parties I love" on the right to see where I'll be sharing my ideas.

Tuesday, June 22, 2010

Cheap Thrills

Summertime is officially here. Lots of fun. Accompanied with lots of, "I'm bored", "There is nothing to do" and "He/She is bothering me". The solution, keep them busy! Sometimes easier said than done, especially when you don't want to spend a lot of money. However there are many great things to do that don't cost much (or are completely free) that don't necessarily require that you GO somewhere. Some oldies but goodies we enjoy are:

Painting $1 models from the craft store. Note that the paint DOES wash off of surfaces easily, but still have the kids wear playclothes!

Who doesn't love a good game of dress up?

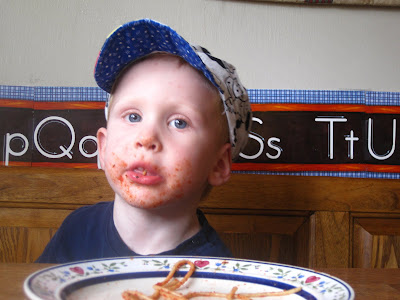
Have fun eating a messy lunch, in this case, spaghetti.

Find a local petting zoo and feed the animals, $0.25 a handful!

By far our best investment all summer long is our $15 wading pool.

Eat your meals "alfresco" (thanks Fancy Nancy!)

Tire them out at the park! Have fun finding new parks in the area that you normally don't frequent.

We had a blast just hanging out at Bass Pro Shop a few weeks back. We rode ATV's and boats, and the place was a Taxidermist's paradise!

You can never go wrong with Kool-Aid playdough.
This is just a sample of things we like to do during the summertime that doesn't bust the bank. What do you like to do with the kids? I'm always up for new ideas, please join in and share your ideas!

Tuesday, June 15, 2010

Paint Your Own Planters

So I'm always on the lookout for inexpensive large pots. As I'm sure you know those aren't easy to find. Even the plastic ones tend to run around $10 for a good sized one measuring 12-14" in diameter. At a local nursery last summer I stumbled across what is now my favorite frugal planter. I found recycled cardboard planters for less than $4 a piece! They are big too, they run around 14" in diameter!

They "technically" are disposable, but I've had them for two years now. Left outside year round and have had no issues and they are as sound as they were when I brought them home.

The only thing is they are a lovely shade of putty, and I wanted something different for the garden. So I got out my trusty spray paint and went to work. The planter above is painted a shade of sage green. It's hard to tell in the photo, but it looks great in person.


Here are the planters in their unpainted state. They are awesomely textured and look so nice once painted. Think of all the options you have, you can make these fit any garden or "look" you are going for. The texturing makes the paint really pop too. They do use a fair amount of paint since they are cardboard, but using cheapie spray paint makes sense here. Plus I think the paint helps the planters become more impervious to the elements.

Keep your eyes open at your local nurseries for these, as I've yet to find them in any big box store. Snatch them up if you find them, I dare you to buy something similar new for less!

Linking up to my favorite linky parties, click on "Linky Parties I Love" on the right for the directory.

Friday, June 11, 2010

Backyard Painting

One of my favorite things to do in the summertime is let the kids paint outside. They LOVE to paint pictures, but since they tend to be messy this is the way to go. It makes the budding Picasso's happy to paint and the Mommy happy to have an easier mess to clean up.

Many times I just throw them in the pool or hose them down to clean up the mess. See, told you it was easy! Plus I always use washable fingerpaints to make the clean up easier.

I usually just take white craft paper and thumbtack it directly to the fence boards. Easiest way I've figured out so far. Here I've just taken easel paper and unrolled it and we also make sure to paint on both sides of the paper to make it stretch as far as possible.

I've also recently discovered that solid wrapping paper makes great painting paper too. Black is awesome, it really makes the colors pop on the paper. You can easily find solid wrapping paper on sale (think after holiday sales).

I have the kids use paintbrushes, foam stamps, their fingers, whatever they like. Dollar stores and dollar bins are good places to find random painting supplies. I even take cheap kitchen sponges and cut them up into shapes sometimes.


Having fun!

For paint pans, I just use those cheap aluminum baking pans. They hold lots of paint and are easy to rinse out and reuse.

My daughter loves mixing up the colors and glopping on the paint.


Fun times! Have a backyard painting party. I guarantee your kids will love it and you'll love how it keeps them occupied and the mess is less!

Tuesday, June 8, 2010

Free Family Friendly Movies!

Regal Theatre Group is staring up their annual Free Family Film Festival this week! All across the country you have an opportunity to view free family friendly films, perfect for hot summer days and stir crazy kids!

Click here to find the listings for the city near you!

I'll be sharing my frugal family fun with the linky parties listed under "Linky Parties I Love", check out the right hand side of my page for the directory link.

Monday, June 7, 2010

Big Daddy-O BBQ Spice Rub

I'm sure as is the case with many households, Daddy is the official "BBQ-er" in our home. He loves to cook on the grill, which is nice for me in the summertime because I don't want to heat up the house! We like using spice rubs on meats and poultry, so I decided to make up a big batch and have the kids give it to Daddy for part of his Father's Day gift. I don't have an official "recipe" for this, as I am one of those annoying cooks that rarely uses one. I'll give you an idea of what we did, but you can definitely tweak this to fit your preferences!

I started with brown sugar as a base. I used a pound bag and just dumped it in a bowl. I purposefully made a big batch so that we'd be pretty set for the summer, this stuff keeps beautifully in a tightly zipped storage bag. And the beauty of it is because it's made of brown sugar, if air does get to it just put a hot dog or hamburger bun in the bag for a few hours and then it's good as new.


To the brown sugar I added onion and garlic powder, italian seasonings, seasoned salt, fresh cracked black pepper, cumin, a few red pepper flakes, some rosemary and some celery seed. I didn't measure, just dumped in and mixed until it smelled good. Whatever spices we liked the best (onion, garlic, italian seasonings, salt, pepper) I used the most and graduated the rest. I would say of the ones we liked the best I probably added 3-4T of each and the rest probably 2-3t. Like I said, add what you like though and make it your own. You know when your done because it'll smell heavenly!

To package it up I took one cup portions and put in a sandwich ziploc bag. I then put it in a cello bag and used a cute zip-tie (found them at the dollar tree) to cinch them closed. I then took cardstock and made tags. I found some "D" notepaper that I had (don't know why, no one had a name beginning with D in our house) and pasted it to the cardstock. I wrote "Happy Father's Day" on the tag, using the D from the notepaper as the "D" in day. Then the kids signed (or tried to anyway) their names.

To use the rub, just generously place on your meat or poultry 10-15 minutes before grilling is done. Just pull the item off the bbq, slather this stuff on and return to the grill. It makes for a yummy meal, I promise! Just don't put the rub on raw meat and grill as normal, because of the high sugar content the rub does burn quickly and it'll char your food if you leave it on for the entire cooking process.

Please click "Linky Parties I Love" on the right to see what parties I'll be sharing this fun, cheap and easy gift idea with.

Friday, June 4, 2010

Joann's Haul

On a trip to Joann's a few days ago I stopped by their clearance section and hit pay dirt! I had to do a bit of digging around, but I found everything below for $1.10!!! Yep, one dollar and ten cents. Two note pads with two magnets included for $0.25 each. One notepad for $0.10. A set of 8 note cards for $0.10 and four 4 packs of magnets for $0.10.

I always go through lots of these types of things, both for list making for myself as well as small gifts for others. I tend to look on Freecycle and Craigslist for free items and whenever I go and pick something up I leave a small little gift with a note. I appreciate people's generosity and like to give a little something in return.

Wednesday, June 2, 2010

My Little Laundry Helpers

So as most Mom's, I've tried my fair share of different laundry products. Sometimes I'm looking for inexpensive products, trying to get the most bang for my buck. Sometimes I'm looking for products that really get the job done. I wanted to share those "go to" products that I use that really get my laundry clean when normal washing doesn't. Meet my little friend, Zout. I've never had a friend who's name has begun with Z. Not many names out there that begin with Z. However, I am so so glad that I met my uniquely named friend Zout. He is a terrific friend. He gets out all sorts of stains that my normal laundry detergent doesn't get out sometimes. Like mud, grass stains, blood, chocolate, ink and grease stains. Oh how he eats up those grease stains. Even stains that have gone through the dryer. Yep, he eats those "set in" stains right up.

In all seriousness, this stuff really does work well. Someone introduced this to me after the birth of my first child, I've been hooked ever since. It gets out an amazing number of stains, and like I said it even works on things that have gone through the dryer. How many times have you pulled a shirt out of the dryer and a grease stain has magically appeared that wasn't there before? Squirt some of the Zout on it, let it sit 20 min or so and that stain will come out the next time you wash it. I've not had it work on a grease stain yet.

My second "go to" for laundry involves this stuff, Clorox 2. Again, when expecting my first child I was turned onto this stuff. I buy lots of baby clothing second hand. Some of it was a little on the dingy side and normal detergent wasn't getting it very clean. I was told about this concoction (by my lovely Momma) and have soaked many an item in it and it's really brightened the fabric and gotten out some old, set in and yellowed stains.

Here is the "recipe": Take 1/2C of Clorox 2 (it has to be this, no substitutions), 1/2C of cheapie automatic dishwasher detergent and dump it in a bucket. Place the clothing inside and fill the bucket with HOT water. Hot water is important, so make sure to just do like colored items to prevent bleeding. Mix it all up well and let it sit, the longer the better (overnight is best). Then dump the bucket, water and all in your machine and wash it on a small load with a small amount of regular detergent, again on hot. I'm telling you, this stuff if magic. Sometimes I'll have to repeat on really stubborn stains but I've only had a few items that this treatment didn't work on.

So those are my "go to's" for tough stains and dingy clothes. I'll share my "bang for my buck" products, including make your own detergent and the cheapest laundry detergent you can buy on another post!

Tuesday, June 1, 2010

One Thing at a Time

I've really been searching for ways to find balance for myself, to not feel so pulled when it comes to running my home. After all, since I am the CEO/COO of the household it's something that I need for myself, my kids and my hubby. Stressed Momma=Stressed Family. So I've been trying to do some reading up on the subject (along with prayer) to get me going in the right direction.Many days I've felt wound up. My patience level is low and frustration level is high. I need to get things lean and mean around here, in my head and in my heart. I just finished reading a really good book, while some of it wasn't particularly of use to me much of it was. "One Thing at a Time" by Cindy Glovinsky is an easy read, written in easily digestible tidbits of advice on decluttering, streamlining and organizing yourself and your life.

The book is written in short, two page "tips". I wrote many of them down, as they were really good for me to write and post to see. Reminders are helpful, and I need all the help I can get!

Here are some of the tips I found helpful for me, in no particular order:


1. Keep it moving on. Laundry, dishes and paperwork need to be in constant motion or they pile up faster than anything else.

2. One thing at a time. Don't look at the big picture, focus on one idea, task or job at a time.

3. BREATHE. When you start to feel overwhelmed and are amping up, breathe.

4. Declutter your body. Get dressed every day, take the time to care for yourself. Why care about investing time and energy in your home if you don't care enough to do it for yourself?

5. Develop daily, weekly, monthly and annual lists of "to do's" for your home.

6. STOP perfecting, START bettering. This is a big one for me, stop aiming for mastery at every little thing and look at the overall picture of bettering your environment. Don't set yourself up for failure.

7. Write it down! Don't keep all the daily schedule stuff in your brain, put it on paper to free up that area of memory and decrease your stress over tyring to remember it all.

8. It's just a problem. Whatever you are facing at home that is making your life more stressful, remember it's just a problem. Keep it in perspective.

9. Do it the EASY way. Make routines and tasks easy to accomplish. No one wants to maintain things that are hard and labor intensive.

10. Put a trash can in EVERY room. Don't make it harder than you need to in order to keep the trash where it needs to be.